
OK, so I am gonna come straight to you guys. I heard about bujo last year and I was so into it. All those cute pretty stuff you could do and feel so organised. I jumped right to it.
I designed a whole bujo for January last year . I ain’t an artist and am average at doodling. So all those adorable designs felt tooooooo overwhelming and time consuming. And with my hectic schedule, I lost track of bujoing and gave up after February.
I always wanted to go back but after spending hours searching for the perfect theme for that month, I was too distracted and would say I will do it the next day and I wouldn’t. I started using my bujo diary for rough writing and it looks cute on my table.
This year I decided to go back to bujoing cause last year I really felt like if I wrote it down, I was more compelled to do it. And I made one change this time, I kept it simple and less time consuming but just as effective.
Also I decided to use A4 paper instead of an entire diary since I was just giving it a try. And didn’t wanna waste an entire diary. If I feel like I can do it regularly after January, I am gonna buy a diary. You can do it anywhere you like paper, diary or even a notebook.
The setting up was simple. I took 8 A4 size paper, you can take any you prefer and then stack them up. Secure their sides using metal clips and then fold them to make a book like structure. Staple the closed end. Do it every 3 inches for better hold and as far left as you can. And you have your bullet journal for the month of January. You can use as many pages as you want in accordance to what you want to enter.
Now comes the decorating.

I found this idea on Google. It’s pretty simple. I just wrote January in cursive and drew fairy lights around it to go with the new year theme. It took me 5 minutes. I also laminated it to make it more secure.
Next is my monthly logs. I wrote the JANUARY in block letters using a highlighter and then again in cursive over it using a black gel pen. Then I drew 31 1 inch by 1 inch square boxes which where my dailies. I drew some straight lines at the right side where my monthly goals would go and the space below was for notes or reminders.
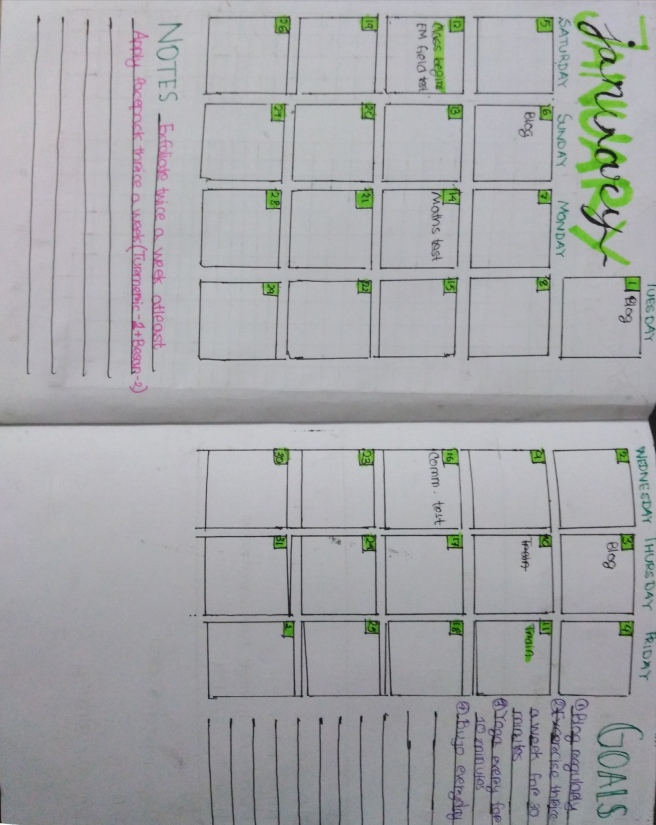
As you can see, I wasnt super neat about it. I made mistakes and I just went along with it cause who cares. We are all a bit messy in our ways.
I wrote what’s important that day or what I should do that day in boxes. Like I marked the days I am gonna blog or when I have my next test. The super important ones like the day I have a train ride or the day my college starts gets highlighted. Also, I planned one week at a time and put them down except for events that’s gonna happen on that day no matter what like a test, birthdays or weddings. This way I don’t feel too stressed and change my future plans in accordance to the events that are occuring at present.

Next is my weekly log. I just wrote the number of week on top and divided one page to 4 and the other to 3. I drew a small banner at the end of each line and wrote the date in it and filled it in with pen. Next to it I wrote the day name and I was done. It just took 5 minutes.
The next page is a life saver for any student. It’s a study tracker. I took this idea from SEVENTEEN and I loved it. But mine came with a habit tracker next to it.
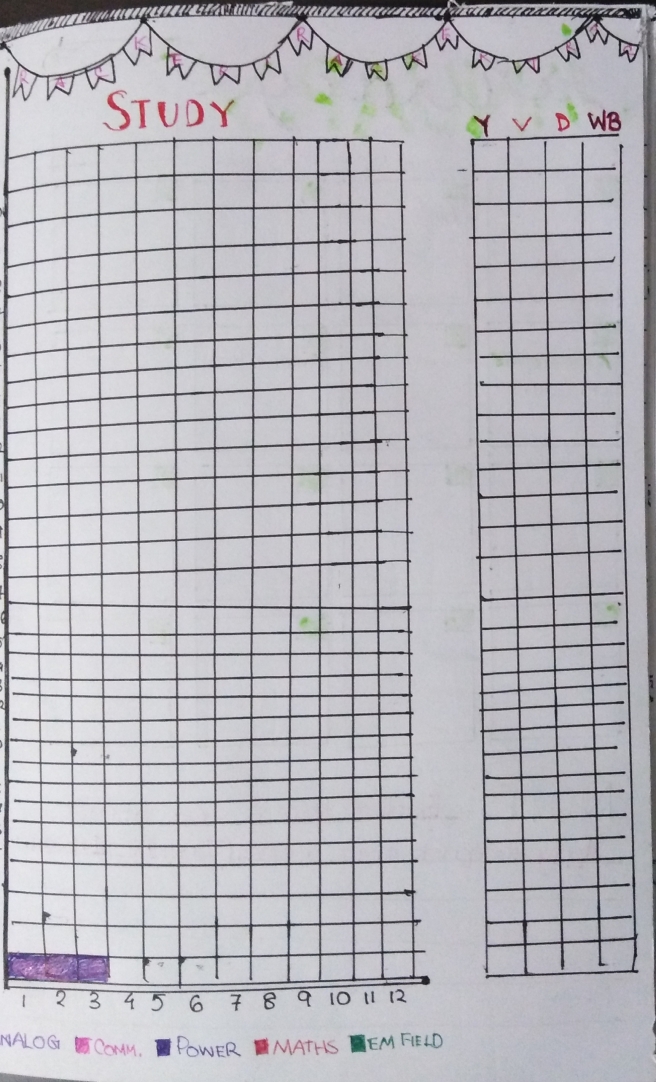
I drew a banner on top and wrote tracker multiple times to go with my party theme. I drew two perpendicular lines as if x and y axis. The vertical line is divided into 31 parts and I wrote the date next to it which seemed to have been cut out while I took the photo. Sorry about that, I am new to all this. Anyways, the horizontal axis is divided into 12 tiny parts which is my hours. Below this I gave each subject a specific color code. For each hour I spend studying a subject I fill up a box in my tracker. So, today on January 1st I spent 3 hours studying power electronics and so I filled three boxes using navy blue color. The reason I had to study 3 hours of power electronics was I didn’t for a long time which is a really bad thing and would cause severe damage to my grades. But by using this technique I can make sure this doesn’t happen again and also I get to say how productive I am.
Next to my study tracker I drew my habit tracker cause I was too lazy to do it again. This month I am gonna concentrate on yoga, vitamins, dancing and skincare. I wrote the initials of each on top. For everyday I perform an activity, I give a tick mark in the box.

The last page is my weekly goals. I divided it into four parts and drew banners and filled it with the week number. Here I write tasks I have to complete that week and for each completion I am gonna reward myself. This makes me wanna do stuff more and I feel more accomplished and happy.
So, yeah that’s my monthly bujo and it took me only an hour to do the whole thing. Actually an hour and a half cause I was watching the marvellous Mrs maisel while doing it. It slowed me down a bit but lovely show.
Hope you find this helpful. And you have full freedom to customise the design and add or remove logs in accordance to your needs
If you found this article helpful, like and follow me. It would mean the world to me.

Don’t laugh, but I thought “bujo” was this new Japanese craze! Now that I know it’s bullet journaling, thank you for sharing your process. My son has been using this technique since high school, and is still using it in college. I hope it helps you as much as it helps him.
LikeLike
I hope so too
LikeLike